Thursday, January 21, 2016

App Thinning in iOS 9 - Same App ,Multiple Variants !!!!


            The concept of App Thinning came to picture from iOS 9.Although there is not so much change in iOS 9, the major change in the new version is App Thinning .App thinning mainly consists of three concepts - App slicing, Bitcode and On Demand resourcing 

When going through the apple documentation, I became a bit confused on the exact meaning and use of Bitcode and App Slicing. Let’s see what exactly the concept is:

Let’s start with a brief history

Before iPhone, Apples compiler technology was GCC. Here the compiler produce executable files as “Fat Binaries” (equivalent to exe files in windows).These “Fat Binaries” have a capability to run on different platforms/processors .

The disadvantage here is that a single file would contain multiple copies of executable file each for different processors or different architectures like 32 – bit and 64 bit. We can call this as a “Universal Binary”. In this case most of the executable files won’t be used and the correct executable will be identified at run time.


This approach  is more likely to be effective on mobile devices than desktop applications because the device itself has much less storage space than a typical hard drive. As Apple moved from the original ARM processor to the custom A4 processor and onwards, the instruction set changed and different versions of code were used. All these are happening internally and nothing needs to be done on the developer side or while uploading on to AppStore.

Now apple has moved from GCC to LLVM compiler. The advantage of LLVM over GCM compiler is that it will compile the source code to a general instruction set which can be translated to (or optimised for ) a specific processor architecture. This general instruction set can be translated to a binary form called “BITCODE” and will be embedded in the final app binary generated.
The bitcode generated for a 64-bit platform will be different from the bitcode generated for 32-bit platform. In addition there will be difference in using stacks and registers while executing the binary. These all are internals and developers don’t need to bother about this.
Now where will these optimizations /conversion happen?

It’s on the Apple Server.

Apps uploaded to iTunes Connect that contain bitcode will be compiled and linked on the store. Including Bitcode will allow Apple store to re-optimize the app in future, when a without the need to submit a new version of the app to store. So if a new processor is introduced, then the same binary can be compiled for that new architecture without uploading a binary again.
All the binaries uploaded will be on the apple server. When a download request came on to this server it will first check the architecture of the target device and then create an app specific to that architecture by doing App Slicing(Slicing is the process of creating and delivering variants of the app bundle for different target device)  and deliver the optimized app to the requested device.


Steps involved while downloading an app
  • Step 1: While building, Source code will be compiled using LLVM Compiler
  • Step 2: LLVM compiler will generate an IPA file with or without BitCode based on the user selected option
  • Step 3: Submitting to Appstore will save the app to Apple server
  • Step 4: When Appstore receives a new request to download the app, it will check the corresponding app in the Apple server for Bitcode. If bitcode is present, Appstore will create an optimized version on the app by doing App slicing, and deliver the optimized app to the requested device.
Bitcode deployments are required for watchOS and tvOS deploments, and can be conditionally enabled for existing iOS deployments with the "Enable Bitcode" option in the project settings. This will add a flag embed-bitcode-marker for debug builds, and 
embed-bitcode for archive/device builds. These can be passed to the Swift compiler with
–embed-bitcode or by using clang with -fembed-bitcode.

App Thinning for Enterprise release

          Till now we have seen the app distribution updates in the Appstore release.
Now, how could the enterprise apps leverage this App thinning feature?.

In most of the enterprises there would be a private Appstore and the apps will be distributed through this. In normal apps the app slicing is done by the Appstore ,so the same kind of implementation needs to be done on the enterprise Appstore also.

Let’s see how …..

While saving the build for enterprise release, select option to export the application for all the compatible devices which will create thinned variants for all compatible devices.
So now the different variants are ready,but still how the appropriate apps are selected while OTA installation?

A manifest file decides this

A manifest file can be generated by checking the option “Include manifest- file for over the air installation” while creating the build.
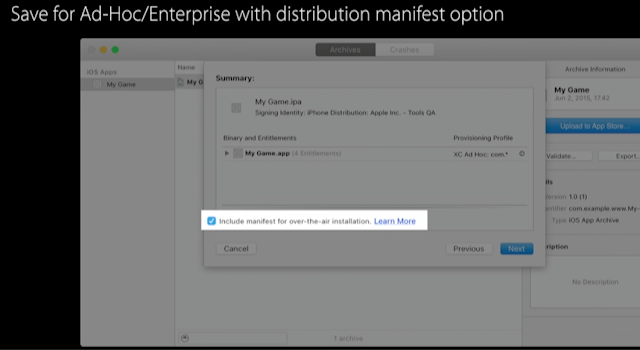


This manifest file contains URLs for each app variant. Device automatically installs URL appropriate for this product type.

So simply the impact here is , when a download request  for an app is initiated from device, it will first go through the manifest file to find the appropriate URL of the app specific to the device and then pull that version down.

Thanks to :
               
http://www.infoq.com/articles/ios-9-bitcode


Monday, August 17, 2015

Apple Pay - The next generation mobile payment Service


                         So its time to look more about the new initiative of apple i.e Apple Pay.
I believe there is no need to have a brief explanation about what an Apple Pay is, because the name itself clearly mentions what it is.

Someone might have a doubt while hearing about this ..Is it the same InaApp purchase available from the initial version of iOS.Is it the new name of InApp purchase ?
The Answer is NO ... Both are entirely different payment methods in iOS

InApp purchase Vs Apple Pay

InApp purchases are normally using to buy electronic or InApp contents.i.e If you are a magazine developer and you want some editions of the magazines to be paid,then InApp payment method can be used.So to buy electronic contents only we are using InApp purchases.

Apple pay provides an easy,secure and private way to pay for physical goods and services like clothes,groceries,tickets,reservations etc.

Apple pay provides two ways to purchase items -
    • At the point of sale using NFC .This needs additional hardware to communicate with the device.
    • Within iOS app to purchase online groceries and services

Apple Pay APIs are provided by PassKit framework ,whereas the StoreKit framework provides APIs for InApp purchases.

Since the InApp purchase system is quite familiar for all I am trying to give a brief introduction Apple pay here.

At the time of writing this blog this Apple Pay feature is available only in US and UK

Prerequisites for Apple Pay integration into an application

    • Apple Developer Account membership
    • Payment gateway Account .Apple recommends certain payment gateways which supports Apple Pay .
    • Merchant Server to handle the product purchased and trigger payment in payment gateway

Setting up app in developer portal

To setup apple pay in an application it is necessary to create a merchant ID through developer portal.Following are the steps for this

    • Login to apple developer portal and create an app ID for your application(Wild card appID are not able to make payments with Apple Pay)
    • Create a new merchant ID by selecting the “Merchant Ids” option under Identifiers .
It is recommended to create merchant identifiers in the reverse domain style that starts with merchant ,similar to bundle Ids


Setting up App for Apple Pay

Following are the steps to enable apple pay in application
    • Enable Apple pay under “Capabilities” tab in Xcode Project
    • Enabling this will list the merchant Ids created in developer portal.Select the appropriate merchant ID .This will add apple pay entitlement file to the project

Designing App for Apple Pay

So now our app is ready to support apple pay.Now one more recommendation is there from Apple in integrating Apple Pay i.e button images or icons using for Apple Pay.
Apple Pay guidelines provides set of design rules for images to be used for apple pay button.In the latest iOS release (iOS 8.3 at the time of writing this blog),a new button control is introduced named “PKPaymentButton”.We can choose type and style for this button.

The Apple Pay Guidelines provide explanations of the allowable modifications you can make to the provided buttons, as well as guidelines on what colors you may choose to provide the best amount of contrast between the button and your view’s background. In general, you are not allowed to create your own button artwork, but can “stretch” the provided artwork to be wider if necessary


Apple Pay Technique

Following are the basic steps involved in Apple pay payment method ;

Step 1

Create a payment Request and present payment sheet
This is a “PKPaymentRequest” object which holds all the informations about the payment like the merchant ID created on apple developer portal,currency ,country code ,details of items ,price details including the shipping cost and tax etc.The payment sheet will be displayed based on the request object passed to it .So all the price details including tax,Shipping costs,any additional costs etc should be specified in the request object.

Step 2

Implement delegate methods


"PaymentAuthorizationViewcontroller(ControllerLdidAuthorizePayment:Completion:)"

 This handles the users authorization to complete purchase

PaymentAuthorizationViewcontrolleDidFinish(Controller)

This is called when the payment request completes

Step 3

Now setup the app in the payment gateway selected(recommended by Apple).For this create a Certificate Signing Request (CSR) in the gateway.Then upload this CSR under Merchant ID option in Apple Developer Account and then download the certificate and upload it to the payment gateway website.Now the gateway will generate an “Authentication Token”(This will be in encrypted format).For some gateways it will provide test tokens for demo/testing purpose before going live.

Step 4

Now send the authorisation token via “PKPayment” (coming as parameter in delegate method

func paymentAuthorizationViewController(controller: PKPaymentAuthorizationViewController!, didAuthorizePayment payment: PKPayment!, completion: ((PKPaymentAuthorizationStatus) -> Void)!){

})

object to payment gateway server (using the APIs provided by the gateway SDK) for decryption.If successful the server will return another Token.(The CSR generation on the gateway server will create a private key on the server .Later this will create a public key on the apple account that is the certificate generated.So the app will be signed using the merchant ID associated with this public key certificate.So when the app sends the authorization token in encrypted format to payment server,it will try to decrypt it with its own private key.If it succeeds then the server will respond with Token).

Step 5

Send this Token from payment server to Merchants own server .The request for this will contain all the details of the product purchased to let the Merchant server know about the product purchased and the cost details along with the token received from payment server
This will be implemented in the delegate method.Now the Merchant server will trigger the payment by calling the API provided by the Payment gateway server.The Merchant server will then respond to the app by sending a success or failure message based on the status from gateway server.

Step 1 and Step 5 will be implemented on the delegate method


func paymentAuthorizationViewController(controller: PKPaymentAuthorizationViewController!, didAuthorizePayment payment: PKPayment!, completion: ((PKPaymentAuthorizationStatus) -> Void)!){

}

If the above process returns success from merchant server then this delegate will call the completion block by passing the “PKPaymentAuthorizationStatus” as success or failure


Apple Pay Technical Flow


Wednesday, October 29, 2014

Is Hybrid apps the “future” of Mobile Development?

Is Hybrid apps the “future” of Mobile Development?

There has been a lot of discussions are happening regarding mobile application development using native approach and Hybrid approach.As Gartner(www.gartner.com),the analysts predicted that by 2016 more than 50 percent of mobile applications will be hybrid.
So its time to clearly analyze the pros and cons of hybrid app development and it advantage over native application development,there by enabling the mobile app owners to take a quick decision,whether to go with native approach or hybrid approach.

What is a hybrid mobile app?

Hybrid mobile apps run inside the native browser container and leverage the device's browser engine to render the HTML and process the JavaScript Locally.No matter which is the target device ,it can be iOS Android Blackberry etc , the app developed using HTML+ Javascript will work on all the devices .So by following this approach following are the advantages

  • Faster time to market
  • Low development cost.Multi-platform applications can be developed in a short period of time
  • Maintenance cost are usually lower
  • HTML5 developers are typically easier to find and less expensive than native developers
  • Web app development knowledge is enough to develop apps
  • A single source code is needed to maintain for multiplatform apps

A lot of helper frameworks are available currently available to support hybrid mobile apps development .Some of them are

Sencha-Touch

        An HTML 5 based framework which provide a lot of mobile specific components and methods.To develop apps using Sencha touch some knowledge about the standards of Ext Js is necessary as it is not following pure Javascript coding styles.So the learning curve here is a bit steep.Sencha touch follows a class system ,so it is easy to manage the code.

Jquery Mobile

        Jquery mobile is also an HTML 5 based user interface system designed to make responsive websites and apps that are accessible on all smartphones,tablet and desktop devices.Compared to sencha touch Jquery provides less number of components and UI is wrapped with a custom jQuery Mobile styles, just like jQuery UI. Page transitions and animations don’t feel ‘native’ enough and can be sluggish sometimes.

Ionic-Angular JS

        This is the youngest among the above two frameworks.Ionic provides a set of Angular directives (custom HTML elements) for it’s own components, making it as easy to use the widgets as writing a line of HTML code. In addition to directives, Ionic uses Angular’s touch recognizers, view animation logic, HTML sanitation, and asynchronous communication.This is not an object oriented javascript framework like sencha touch.This can be observed as a weakness or a strength,depending on the level of simplicity requested on the JavaScript front end.

All the above frameworks provide a lot of UI related component and APIs ,but none of these framworks provide any ways to access native device directories or native features like Camera,Photo Library etc.
Cordova(Phonegap) is using to solve this issue

Cordova (Phonegap)

        Apache cordova is a set of device APIs that allow a mobile app developer to access native device function such as camera,accelerometer etc.Combined with Jquery Mobile ,Sencha touch ,Ionic etc, this allows a smartphone app to be developed with just HTML,CSS and JavaScript.

Titanium Appcelerator

        Compared to other hybrid frameworks ,the concept here is a bit different.All the other frameworks are using the devices basic web-view to render the app pages,but here the code written using the Titanium APIs will call the corresponding methods in native SDK .For example to add a button to a page titanium SDK uses a class named Titanium.UI.Button.On compilation this class will access the corresponding UIButton class in iOS Sdk if the app is for iOS or will access the Button class in Android.This approach gives a fully native appearance to the app as it is not using the Web-view and will work just like a native app.But here also a lot of limitations are there.The more complex your applications become, the more often you’ll have to deal with, on the one hand technical issues (random crashes, weird behaviors, annoying bugs, etc.), on the other hand a greater effort (code organization, MVC separation, multi-device support, multi-platform support, code readability, etc.

Drawbacks

Now coming to the drawbacks of hybrid app development .

  • Potential performance issues
  • Some features may not work in all mobile platforms (for example : webworkers which is commonly using in web based apps is not available in lower versions of Android,pdf support is not available in android browsers,but it is available in iOS browsers.)
  • Native frameworks can provide advanced functionality that cannot always be easily replicated on the HTML5/CSS/JS side
  • UI design will become difficult if need to handle multiple sized devices.
  • Privacy is not guaranteed in hybrid apps.

Summary

If the user is expecting a high performance app with rich UI and animations then ,surely Hybrid is not a solution.But for simple multi-platform apps with limited number of screens and less animations then Hybrid will be a better option.


Sunday, February 13, 2011

Epub Reader

After a lot of search, i finally found a solution to read ePub files for iphone.Few months before i had posted a question in stackerflow.com about a reader for ePub files in iphone.So many peoples answered with their ideas.From the various answers  got from there i finally created a reader for ePub.

Here are the steps to create an ePub reader.


  1. Create a view with a UIWebView
  2. Download the EPUB file
  3. Unzip it to a subdirectory in your app's documents folder 
  4. Parse the XML file at META-INF/container.xml (if this file doesn't exist the EPUB is invalid) using TBXML, linked above
  5. In this XML, find the first "rootfile" with media-type application/oebps-package+xml. This is the OPF file for the book
  6. Parse the OPF file (also XML).
  7. Now you need to know what the first chapter of the book is.
    • (a) Each <item> in the <manifest> element has an id and an href. Store these in an NSDictionary where the key is the id and the object is the href.
    • (b) Look at the first <itemref> in the <spine>. It has an idref attribute which corresponds to one of the ids in 
    • (c) Look up that id in the NSDictionary and you'll get an href.
    • (d) This is the the file of the first chapter to show the user. Work out what the full path is (hint: it's wherever you unzipped the zip file to in (3) , plus the base directory of the OPF file in (6))

8) create an NSURL using fileURLWithPath:, where the path is the full path from (7c). Load this request using the UIWebView you created in (1).

You'll need to implement forward / backward buttons or swipes or something so that users can move from one chapter to another. Use the <spine> to work out which file to show next - the <itemrefs> in the XML are in the order they should appear to the reader.

Thanks to Euan(Stackoverflow.com)


You can download the sample code from here